Thursday, September 27, 2012

Horror on the Orient Express Kickstarter


Gentlemen, not a wargaming post I'm afraid, but a flashback to a previous life. I rarely play roleplaying games these days, but when I did, Call of Cthulhu was the Rolls Royce of the genre. Frank Chadwick wrote once that all good wargames are roleplaying games and he was absolutely right.

But as for gathering around a table and generating characters and rolling dice, I haven't done that in a while.  I can't imagine that I'm alone in this, I know that Furt over at Adventures in Lead is an enthusiastic Call of Cthulhu player. For those of you who are unaware, Call of Cthulhu is a roleplaying game based on the writing of HP Lovecraft, a early 20th century horror writer from Providence, Rhode Island. His works are in the public domain and are freely available here.

You can also hear a friend of mine, Graham Turner, read some of his work here.

In Call of Cthulhu, players take on the roles of ordinary folks and investigate mysterious happenings, haunted houses and murderous cults devoted to the worship of abhorrent alien Gods.  There have been some very good adventures written for the game and Horror on the Orient Express is one of them. Released in 1991, it takes the players on a journey across yourself on the eponymous train in an attempt to...well, I'd rather not spoil the surprise.

Chaosium, the publisher, have started a Kickstarter to raise funds for a new edition of the scenario. Out of print copies have been rarer than hens teeth for years, I once nearly spent a weeks wages on a copy of a couple of years ago, but was outbid by someone even more crazed than I. The new edition will feature new material, extra scenarios and variety of high quality handouts. There are three days left on the kickstarter, so there is time to pledge if you fancy getting the band back together or just want to read a new edition of a piece of roleplaying history.

This flashback to Kinch's awkward teenage crush on Call of Cthulhu will end now.

Wednesday, September 26, 2012

Questions from Dave Lynch


One of my holiday snaps, taken while passing through Conwys

While I was away and every right thinking chap was turning his mind to gathering two of every animal and building a boat, Dave Lynch, new to this parish left the following comment. 

Dave wrote. 

"I enjoy your blog and the photos - thank you for taking the time to share it.

Based in large part on what I have seen in your blog, I am in the process of converting CCN to miniatures. My game mat is from HOTZ, and is 4" hexes. A few questions, if I might:

1. I'm planning on mounting my lads on 3" x 1.5" bases for infantry, 3" x 2" for cavalry, and 2" x 2" for artillery. I haven't decided how to account for "block loss"; what do you do?
One thought is a small laminated label with boxes that I can "check" when a casualty is taken. 

2. The rivers - did you make them, or are they commercial? Did you have to cut the pieces down to fit?

3. Going into square - how do you represent that?

Again, thanks for your efforts!"

Thank you Dave for writing and in answer to your questions. 


Spaniards on the march

I'm not a fan of casualty caps or rosters. I've written about them before and you can see how I do it here. I'm not convinced that my system would work for your setup, though I think it depends on what size the figures are and what you prefer yourself.  Lee's "Napoleonic Therapy" blog is also a good source of ideas.


The dreadful rage of water in mine ears

I make the river myself, using MDF cut to size by those obliging chaps at Products for Wargamers.  For value and speed of delivery, I can't recommend them enough. I would spend the money on the MDF rather than trying to cut it yourself as trying to make sure that everything is the right size is a purgatory. 

You can see my efforts here and here


I will have to update these posts, as I've found with time that the PVA warps the wood and becomes cloudy. I have tried and have been reasonably successful with using Citadel 'Ard Coat instead and just painting a couple of coats on. Thank you for bringing my attention to these. 


A Portuguese battalion, wreathed in gun smoke, forms square

My figures are based singly (I hate rebasing, it is soul destroying) and have magnetic material mounted on their bases. I then put them on a metal plate and arrange them as needs be. Usually when forming square, I just take some of them off and arrange them in something like a square formation. This usually only happens a couple of times per game, so it's no great hardship. I have been toying with the idea of dedicated square bases. 


The Battle of Albheura by Woolen

In my minds eye, I keep seeing images like the one above, but I don't think it would be practical really. A small diorama base, with flags and pennants flying would be wonderful, but I think with other armies to build and lacking unlimited money, they are very unlikely to ever appear. 

I hope these have answered your questions. 

I have returned...


Kinch Snr & Jnr on the way back from Oxford

...whole and hearty, though somewhat soggier than planned.

Our trip to Britain was wonderful. We covered quite a lot of ground and I think it might actually be worthy of a Bob Cordery style travelogue. I regret not bringing my SLR, though I took a lot of pictures on the phone.

Highlights of the trip included -

- having breakfast with Old John and meeting Mrs Old John. I got a tour of the wargames room and returned with many, many figures.

- Worcester Cathedral. Words fail me. What a building and what a welcome.

- attending a sung Eucharist in Christchurch, Oxford. A wonderful service.

Britain is experiencing some pretty extreme weather at present, but fortunately it didn't really impinge on us until we were on our return journey. A great deal of credit must go to the road crews and police we saw on the way back, doing a hard job under pretty lousy circumstances. Well done chaps.

It was great to get home and see Mrs Kinch and the cats. I have a lot of blog posts to catch up on and some questions from Dave to answer.


Wednesday, September 19, 2012

Mon Mouchet - 10th June 1944


I got myself a Mechanical Turk

I took Mrs Kinch out for lunch yesterday as I'll be away for a few days. This meant of course that she had to get ready, so I had about twenty five minutes on my hands. I had set up the Mon Mouchet scenario on my table, so it seemed like a perfect opportunity to try a solo game. 

Now Ross Mac may have the mental wherewithal to distance himself from the battle so that he can take a dispassionate view.  I, on the other hand, get a little more involved - also I don't like playing the baddies, which left me in something of a quandry when it came to solo wargaming. However, we live in a fascinating modern age of FaceTubes and YouBooks and Memoir '44 online. Memoir '44 online is the board game rendered as a computer game. It's free to download and free to play, for a trial period. Games cost "gold", which can be bought from Days of Wonder, but a free account will give you 50 gold, which is enough to play twenty or thirty games. Further gold can be bought from the online store and a game works out at around five cent per game. The obvious attraction is that one can play online against other people, but there is a computer opponent called "Johnny", though if you play as the Allies, he is called Helmuth.

And Helmuth was going to solve my solo-wargaming problem. I opened up Memoir '44 online and selected the Mon Mouchet scenario. My plan was to use the computer to adjudicate the cards and dice, while Helmuth provided the opposition. I could of course, just played the game on the computer without moving toy soldiers around, but where would the fun be in that?


The game took about twenty minutes, as that was all the time I had (there is a limit to even Mrs Kinch's preparation time), and was played to a conclusion. Please forgive the shockingly poor photographs as they were shot using my Iphone at speed and on a particularly sunny day. 

For those of you who might wish to refresh your memory, the set up and scenario can be viewed here


Helmuth opens with an aggressive move toward my centre. The French Resistance units are treated as regular infantry, but with only three figures instead of four. They may choose to retreat up to three hexes rather than the more usual one when forced to retreat. They may also ignore terrain penalties for combat.

In short, they are nimble and hard to pin down, but brutally easy to wipe out if they can be caught in the open. A French Resistance player needs to move fast, concentrate, hit hard and then scatter before the inevitable counter-attack.

I concentrate three Resistance units on the German probe, wiping it out and scoring one point for the Resistance. This scenario was to four points, though the Resistance counted German armour units as two victory points. The point should also be made that the German armour was rated as elite. They weren't really, but for men armed with small arms and fowling pieces, any armour is very hard to deal with and this is a handy way of dealing with that issue.


German armour and infantry move forward on the left. I had hoped to be able to move my Maquisards into the treeline at the top of the picture and make them fight for it, but Helmuth beat me to the punch.


Reckoning that I would be unlikely to get such a tempting target again, I played Air Power. A wandering USAF typhoon or something similar, shot up the advancing German column. I'm not sure if there's any historical justification for this, but needs must.

Perhaps a more air minded fellow could enlighten me? Brother Gow?


Undaunted, Helmuth pounced on a Resistance unit in the open. He was unlucky in his dice though and Francois and friends managed to scamper away before he could do much damage.

Thwarted, he made his Overrun move and decimated the unit of Maquis hiding in the nearby houses. But and this was an important point, he failed to wipe them out.

Lured into fighting in a build up area and seperated from it's infantry support, Helmuth's armour was at a disadvantage and was forced to retreat by a Maquis counter attack.


Obviously realising his mistake, he moved his infantry up. It was too late and a Maquis unit using a "Behind Enemy Lines" card (which allow a unit to move, battle and then scarper) ambushed the German armour before it could rejoin it's supporting infantry. With armour counting for two victory points, this put me on three victory points of a required four. Things were looking good.


The supporting infantry moved out of the treeline ready to smash to the now exposed Maquis, but their luck held and the German attack fizzled.

A fusillade from the surprised Maquis was equally ineffectual and merely resulted in the Wehrmacht scurrying  for cover.

Helmuth's counter was a much more worrying development as the second unit of German armour started rolling through the trees towards me. I had been lucky to destroy the first one, but that had taken good fortune and two of the best cards in the game, I was unlikely to be so lucky a second time.


In the hope that I could settle this quickly, before the German armour started rolling all over me. I moved a Maquis unit forward to target the weakened Germans, but it was not be.


But it was not to be. Not only did I fail to daunt the Kraut infantry, the armour promptly machine gunned the exposed Frenchmen, wiping them out.  Overrunning the unit, Helmuth pushed through and was poised to hit me a second time, ready to target the two weakened units that had did for his chums in the first tank unit.


He promptly did for one unit of Maquis, making the score two - three to me. This had suddenly gone from a German washout to much closer proposition. He followed up, but failed to scare off the one plucky fellow that remained.


Amazingly, he manages to drive off the tanks, no doubt with a barrage of molotovs. However, Helmuth is showing a distressing tendency to focus on where he's winning and at present he's dictating the pace of the battle. This will have to be stopped. I need to end this before he can bring his superior numbers, not least because Mrs Kinch is beginning to show signs of nearly being ready.


I  move up another group of fighter on the right. It's a long shot and they take a single stand from the German infantry, but I hope this will draw Helmuth's attention away from my vulnerable left.

Helmuth plays a "General Advance" card allowing him to move troops on a broad front. He pushes his armour forward to threaten my weakened group of fighters, seizes the village in the centre and pushes forward on the right. I got his attention, to be sure, but this is proving to be a little more than I bargained for.


With Helmuth's infantry ready to pound me in the centre and his armour poised to do the same on the left, I take a gamble and move every full strength unit I have into the centre. The plan is to concentrate fire on the exposed German unit near to the village in the hope of whittling it down. It this fails it is likely the exposed Resistance fighters both in the centre and the weakened group on the left will be annihilated either this turn or the next and that will spell the end for the Maquis.


But we manage to pull it off. Concentrated fire from everything the Maquis have puts the Germans, I suspect an element of the Jesser Brigade, to flight. I snap this last picture and grab my coat as I hear Mrs Kinch's footsteps on the stairs.

This was a very enjoyable game, rather more enjoyable than I was expecting to be honest. Harder too, I thought Helmuth was going to pull it out of the bag when he got his second armour unit into play. Mrs Kinch looked at me a little queerly when I told her I had been playing myself, but it is possible to play a proper wargame by oneself in about twenty minutes and that is worth knowing.

Perpetual light shine upon them


Grant them eternal rest, Lord and let perpetual light shine upon them.

Tuesday, September 18, 2012

The Maquis of Mon Mouchet


Listen carefully, I shall say this only once...

I've been slowly gearing up to play a little Memoir '44 again, though this time with 1/72 scale figures. I have an extensive collection of 6mm figures for the Eastern Front and I will experiment with those in time, but for the moment, I will stick with the big toy soldiers. However, my chum Donogh over at Land War in Asia has been gearing up for a spot of solo-wargaming as part of Solo November

Now there are plenty of chaps who seem to enjoy this sort of thing, I wouldn't normally count myself as one of them. Ross Mac seems to extract great enjoyment from it, but I would miss the social aspect of it. I have played a little Force on Force solo, more to teach myself the rules than anything else.  My father often warned me against drinking alone, the same stricture may indeed apply to wargaming.

That said, it is solo wargaming is not incest nor is it folkdancing and it is therefore a legitimate object for a try anything once sort of thing.  


Partisans by SHQ miniatures. 

I will be playing a French Resistance scenario as I don't have sufficient figures to play any of the others. I'll be using my usual Napoleonics set up with Second World War figures added and the scenario will be Mon Mouchet.


From the Memoir '44 Rulebook

"On June 10th, three tactical groups from the Wermacht, about 2,000 men with armored support, converged on Mont Mouchet. Simultaneously moving in from the west (Saint Flour), north (Langeac and Pinols) and east (Le Puy-en-Velay et Saugues) they were determined to trap all French Resistance troops in the area. Violent fighting occurred during the entire day. The French companies made use of their knowledge of the wooded and hilly terrain to hold off the advances and finally forced the enemy to temporarily fall back to their starting positions.

The stage is set, the battle lines are drawn, and you are in command. The rest is history."


The board is set up and I shall report back after the game. 

I will of course, be playing the gallant Maquis. En avant!

Some more things found in the depths of the box room


1/72 Zvesda Medieval Russians


1/72 Medieval chaps, damned if I can remember what they are exactly


 1/72 Austrian Cuirassiers


Monday, September 17, 2012

Stuff for sale or trade


Updated: Stuff that has moved already removed. 

Gentlemen,

I have while going through my wargames room come across some things that I picked up for projects that never materialised or that is surplus to requirements for one reason or other. All of the above is available for sale or for trade. To be honest, I am far more interested in trade than sale. If you do see something you like, make me an offer - though rather than messing about with paypal and so forth, I might ask you to order something from my wants list for delivery to me.

Buyer pays shipping, though I'm willing to ship anywhere.

RISK 2210 Board Game (complete - box opened, but never played)
One Airfix 1/72 Stug Assault Gun
Two boxes Zvesda 17th century Cossacks (sealed)


1/72 Italeri Teutonic knights, two sprues.


Italeri Medieval challenge set, mostly intact, you can view the sprues above.


One box HAT Saxon Infantry, complete


What I'm looking for

I want to build forces for the British and Americans during the Second World War in 1/72. I have infantry, but I would be interested in armour, particularly fast-build kits by Armourfast, Italeri or Plastic Soldier. Early war British infantry would also be of use.

I have a small Cold War force for the British, Americans and Soviets in 1/72. I would be interested in expanding  those.

Zvesda Napoleonic Russians would also be very welcome.

That said my interests are eclectic, so there is no harm in dropping me a line in the comments if you see something you like.


Saturday, September 15, 2012

Finished !


YouTube Video


It's finally done. After nearly a week of effort on and off, I finally finished putting some sort of shape on my wargames room. I discovered a lot of stuff that I had forgotten about, including some elderly Second World War stuff in 1/72.
Phew! Now all I have to do is replace the floor.
- Posted using BlogPress from my iPhone

Friday, September 14, 2012

Kinchs on tour

So far Mr Kinch Snr and Mr Kinch Jnr felt their holiday was going rather well

Dad and I will be taking a trip to Britain next week. We haven't seen each other much this year and thought a road trip would be good fun. We're heading over via ferry, meeting up with Old John on the morning of the 20th for a chinwag and then heading on. Dad is keen to visit Liverpool, see the Liverpool Tate and the museums there. Oxford has been mentioned as a possibility - but I think that would be the furthest afield we'd be looking to travel as we don't want to spend too much time driving.

Any suggestions?

Sending them back in the same old way.

Ducks on their way to a date with destiny 

Some of you may recall that I had a clear out of the War Room some time ago and offered a Roman Villa free to a good home. There were several interested parties, but I decided that the prize should go to the fastest gun. Unfortunately, I forgot to specify whether this was the fastest gun to leave a comment on my blog or the fastest gun to leave a comment on TMP. The result was that I had two parties both of whom were morally equally entitled to consider themselves the victor.

They were Rosbif and James.

Here at Joy and Forgetfulness, we respect tradition. We value continuity and stability. So it was important that this difficult question be settled in a manner fitting the solemnity of the occasion. Consequently, I decided that we would settle this matter as our forefathers would have done.

By shooting a NERF gun at rubber ducks.

 A NERF gun - an elegant weapon for a more civilized age

You will observe the NERF gun before me, it carries six foam darts. The ducks which are sitting on the arm of my favourite chair have been marked underneath with stickers. Mrs Kinch kindly added a sticker to the base of each duck bearing the letters "US" or "OZ". She did this without my knowledge so that I could open fire safe in the knowledge that I was entirely ignorant of which ducks were Aussies and which were Yankees.
 The first casualties fall

The idea being that the last duck standing would take the prize for his home country. You'll have to forgive me for the poor quality of these shots, but they were snapped on my Iphone camera after I returned from a dinner party. Mrs Kinch and I has spent a very pleasent evening with some good friends, though I dined rather well. Consquently I was not quite as handy with either gun or camera as I might normally be.


 A Cowboy duck - marked US unsurprisingly 


 The final round clips the toy soldier duck and knocks him off the arm of the chair 

I called a halt at this moment, firstly because though toy soldier duck remained standing, he had been hit and Bigglesworth duck had not. Secondly, I had fired all six shots and I would have had to go upstairs to get more ammunition.

Bigglesworth duck - marked US

The flash has really blown out the white of the label here - but the label is marked US rather than OZ, so the villa will be heading to the United States rather than the antipodes.

No ducks were harmed in the writing of this blog.

Thursday, September 13, 2012

Talavera - 28th July 1809


"Oh Lord," thought Blackie, "Kinch is going to write another cat post."

I have, I must admit, been neglecting Joy & Forgetfulness of late. So much so that I have resorted to that last resource of the scoundrel, videos of the cat. But pardon gentles all, I shall shall call forth into this cockpit, the bloody field of Talavera!

The battle of Talavera took place in the summer of 1809; Wellesley had returned to Portugal and kicked Soult out. His plan was to advance into Spain, join with the Spanish force under General Gregorio Garcia de la Cuesta and kick Frenchy in the pants. This admirable goal was complicated by the fact that Wellesley was relying on considerable Spanish help for his logistics, which did not materialise and secondly and perhaps more importantly, the aforementioned   General Gregorio Garcia de la Cuesta who had beaten out a crowded field to take the award for "Maddest, most useless bastard ever to command an army in Spain."

The Allied army marched up the Tagus valley with the idea of threatening Madrid which was in French hands. They arrived at Talavera, a city about seventy five miles southwest of Madrid and which was also occupied by the French. The Allied army had an opportunity to fall upon part of the French army under Victor, but this opportunity was missed when General Gregorio Garcia de la Cuesta (now say it three times fast) informed Wellesley that the Spanish army could not possibly fight on a Sunday. This delay allowed the French time to withdraw and return in force. 

The Allied army then took up a defensive position to await the French assault. Wellesley certainly wasn't going to attack equal or greater numbers of Frenchmen with such an unreliable ally. The British army was drawn up on some high ground Cerro Del Medellin with the Spaniards to the British right, south of their position. There had been some preliminary skirmishes as the Allies had fallen back to this position and Victor's troops had managed to briefly take the heights during a night attack, but were driven back by British reinforcements. The following morning, reinforced by Ruffin's and Sebastini's troops, the French were ready to attack again. 

This particular scenario covers the British section of the battle only and is complemented by a Spanish scenario that came in the Spanish expansion. I hope to play them as an Overlord scenario before too long. 

But enough of this potted history nonsense, there are far better places to read about it.  On to battle!


Capability Savage surveying the battlefield

We played this game a few short days after Mrs Kinch left hospital. Donogh had had to head off already, but Capability Savage was still with us and Tootsie Royale (Mrs Savage) was giving Mrs Kinch a welcome respite from my company. However, Mrs Kinch was fading as her drugs were beginning to take effect and Tootsie had given notice that she would be leaving shortly. Consequently, Savage was playing under a time constraint, which probably did him no favours.

Admittedly, the brake fluid he was drinking didn't help either.


The 31ieme Legere move forward in an uncharacteristically cautious first move from Savage


Supported by the second battalion and the Legione Irlandaise in the centre


The 8ieme also move forward

Meanwhile on the right, French line infantry start to move out of the tree line. There are Frenchmen advancing everywhere.


The French guns move forward to support the infantry advance. General Sebastini out front waving his hat!


The Fourth Foot and the 60th Rifles fire their first volley across the Portina brook, causing a few casualties. A lucky shot from the French battery decapitates the Major leading the 60th, leaving them in disarray. In game terms, they managed to score the maximum possible casualties, taking two stands away from a three stand unit. It didn't seem likely to me that they were quite at canister range, so I rationalised it that a senior officer had been hit with the obvious serious effect.


The entrenched British guns return fire, aiming for that damned ass Sebastiani, but hitting the poor fellows behind him. Poor form I know. It is not the business of generals to fire cannon at one another.


The French light infantry advance, a shifting wall of blue and green


A sharp encounter sends the Royal Americans tumbling to the rear, though inexplicably leaving a redcoated casualty behind.


The Fourth Foot are flayed by fire, losing half their numbers, but the second volley does precious little. The Highlanders move up in support.


The British skirmishers return fire, but the officers keep the men in hand, hoarding that precious first volley until Johnny Crapaud gets good and close.


The French move forward and platoon fire starts to crash down the line, deafening and blinding the men in the ranks, but sending the 31ieme Legere packing.


The Foot Artillery on the ridge add their fire to the torrent of musketry and the Irishmen head for the hills. 

The score is 2 - 1 to the British at this point.


Reasoning that his cavalry superiority isn't being made best use of, Savage threw to regiments of light cavalry across the stream, supported by a battalion of the 22ieme Ligne, which took the village. Between sips of Chateau D'Domestos, he explained that he intended to force my horse to attack him, clear them off, then force the chaps on the ridge into square and then roll them up with his infantry. It's always hard to tell with Savage if this is his usual confidence, the last act of a desperate man or simply the bleach talking.


So far so good and things were looking decidly dicey for the British. The Chasseurs charged the British guns and put the gunners to the sword. On paper this was a lunatic play and only Savage would be mad enough to attempt it. At best it has a one in twenty seven shot of success, but only Savage can plan for Savage's luck.

Score - two all.

Meanwhile, I was damned if I was going to be distracted from the flank where I was winning. I sent the Highlanders and the Halberdiers across the river with the order, "I want that demmed Frenchy's hat - go get it boys!".
General Sebastiani managed to make away, but the French infantry melted away before the crashing volleys of the Highlanders and the incessant sniping of the Halberdiers. The French guns decided that discretion was the better part of valour as well.
Halberdiers wading through the bloody brook. Those wounded near the river would be counted lucky by the end of the day - at least they could get water and were better off then those poor fellows in the dry, long grass, burned to death when it was lit by burning wadding.

The Chasseurs charge the 57th, who failed to form square (actually I choose not to) and were badly punished as a result. I sent the 18th Light Dragoons to relieve them, but the "Drogheda Cossacks" were having an off day and only managed to get themselves badly cut up in a counter charge.

The Chasseurs were eventually put to flight by the Connaught Rangers, who wheeled in line and gave them a volley from which there was no coming back.

Score three - two the redcoats.


Things were looking grim on the right as well, General Sebastiani rallies the wavering second battalion of the 8ieme Ligne and led them in a full throated charge straight into the Highlanders. Appearing suddenly through the smoke, the Frenchmen put the Scots to flight.

Score three all.


Another volley from the Rangers sending the Hussars of Conflans to the rear, no doubt to check their curls, and drops a French general on the way.

Score four - three to the redcoats.


Meanwhile, the 8ieme Ligne attempts to capitalise on the confusion caused by the sudden rout of the Scots, by pouring on the pressure on the Halberdiers, but despite causing a casualty - they fail to crack the light infantrymen.


Having already accomplished one impossible thing before breakfast, Savage decides that a second in neccessary. In a foolhardy move, but not impossible. He has a better than even chance of disposing of the Cossacks, which would then allow him to sweep into the 57th infantry, who he stands a 50% chance of wiping out, this would leave Daddy Hill in a tough position and likely to be taken. The odds are against Savage, but if he succeeds he could take three flags in a turn, which would leave me in very hot water.

Unfortunately, the Hussars of Conflans fluff their charge and are promptly counter charged by the 18th Light Dragoons, eager to avenge their earlier poor showing.

Score Five - Three to the redcoats.

Meanwhile on the right, the Halberdiers splash through the brook to give the French the bayonet. The gunners in the redoubt support them with fire and Sebastiani is taken in the front and side by a combined arms attack.

And the dice are very favourable, the Frenchmen flee the field.

Score Six - Three to the redcoats.


And General Sebastiani is taken as the Halberdiers under General Sherbrooke extract vengeance for the fallen Scottish friends. In a torrent of blasphemy and Toilet Duck fumes, Savage concedes.

Score Seven - Three to the redcoats and it's game.

As it turns out I had been sitting on a very good hand of cards, but had been unable to use any of them - mainly because Savage was continually hustling me with his constant attacks.


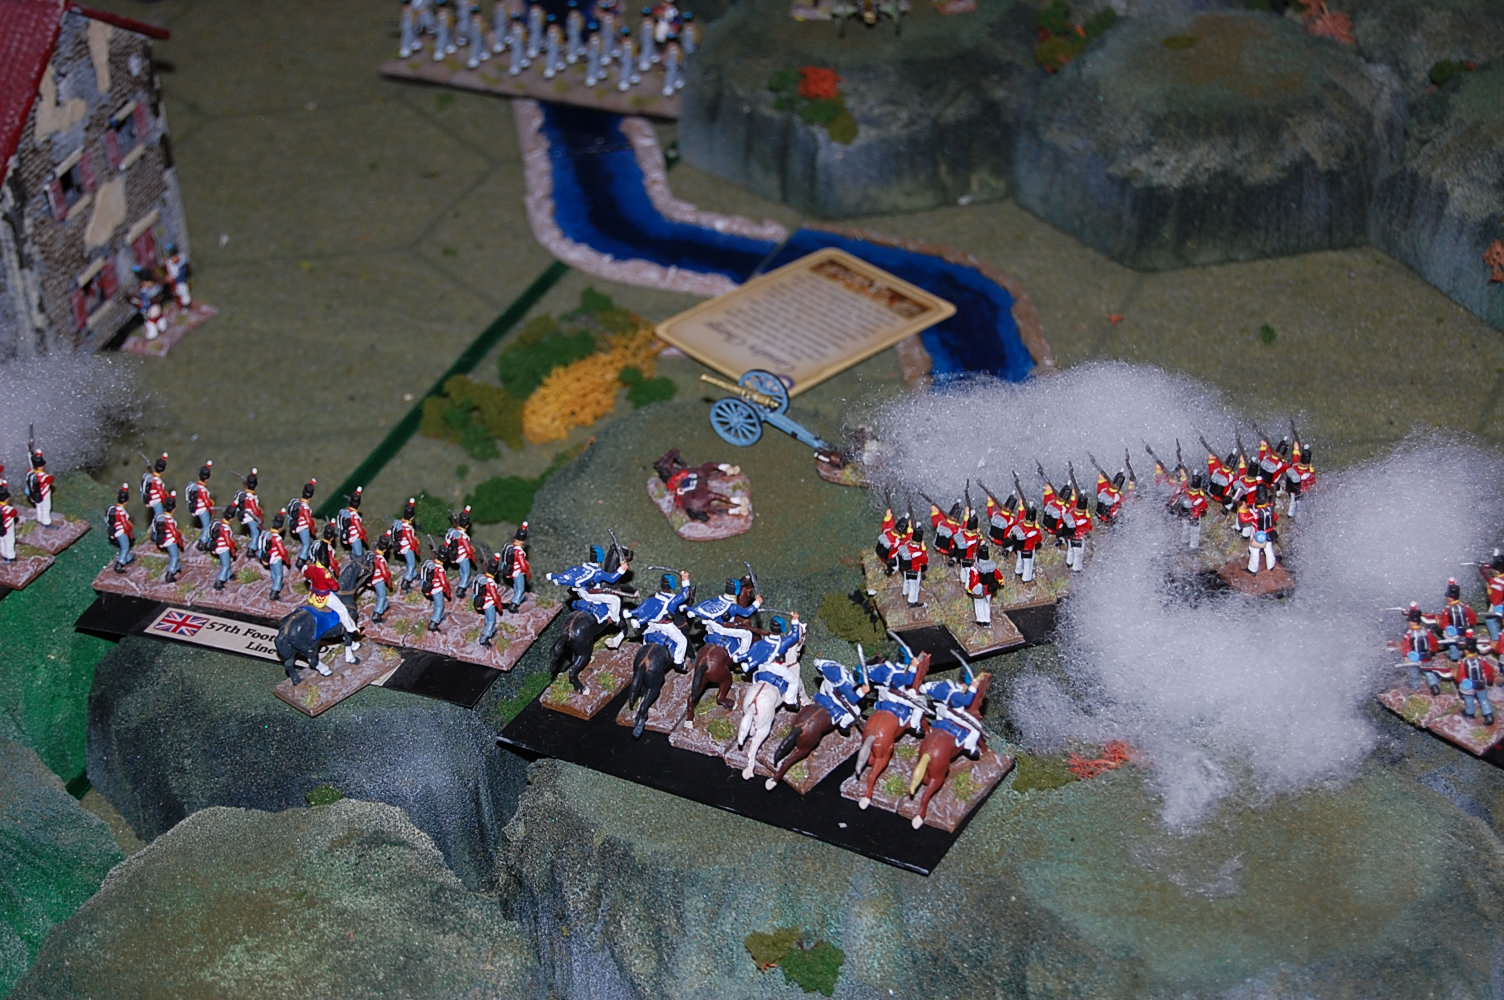
The battlefield at the end of the engagement. I think the gunsmoke gives a good indication of where the majority of the fighting took place. It's interesting to note that Savage didn't manage to get infantry heavy centre into the fight and I think suffered for it. His cavalry attacks would have been more crushing if they had been properly supported. Also, those units of his that did the fighting did all of the fighting. There were plenty of fellows who just looked on.


And it's time for home...

A good game and one that took thirty five minutes to play. There were plenty of moments where I think it could have gone either way, but on the whole, I think Savage did himself a disservice and attacked before he was really ready. If he'd taken his time and moved his infantry up in the centre, I would have been watching a much stickier situation.

Also, with this scenario in the bag and added to the Peninsular battles page, I now have a complete collection of Peninsular battle reports from the basic game. All that remain from the basic box are the two Hundred Days scenarios.

Then of course, there are the Spanish scenarios. But those I think will have to wait for another day.